

What is DNS?
DNS (Domain Name System) is the system that enables devices on the internet to find and communicate with each other. Often described as the internet’s phone book, DNS translates human-friendly domain names—which are easier to remember—into machine-friendly IP addresses. When you enter a domain like www.example.com in your browser, DNS resolves that domain to the corresponding IP address so the browser can connect to the correct server. Running and maintaining a reliable DNS server is essential for performance, availability, and security, especially in larger networks.
Why Is a DNS Server Important?
A properly configured DNS server ensures users can access services and websites without interruption. Misconfigured DNS can cause widespread connectivity problems, degraded performance, or even expose the network to external threats. For these reasons, careful planning and ongoing administration are critical when deploying a DNS service.
1. Requirements for Setting Up a DNS Server
Before installing a DNS server, verify the following requirements:
- Physical or Virtual Server: You need a machine to host the DNS service. This can be a dedicated physical server, a virtual machine, or a cloud instance.
- Operating System: DNS servers commonly run on Linux or Windows Server. Popular software includes BIND (Berkeley Internet Name Domain) on Linux and Microsoft DNS Server on Windows.
- Static IP Address: Assign a stable IP address to the DNS server so clients can reliably reach the same address.
2. Installing a DNS Server on Linux with BIND
BIND is the most widely used DNS server software on Linux. The general steps to set up BIND are outlined below.
Step 1: Install BIND
Install the BIND package using your distribution’s package manager. This process installs the BIND daemon and supporting files needed to run an authoritative or caching DNS server.

Step 2: Configure the DNS Server
After installation, edit BIND’s configuration files. The main configuration typically resides in /etc/bind/named.conf or similar locations depending on your distribution. In this file you declare zones and include zone file paths that contain the actual DNS records.
Example configuration entries declare a master zone for a domain such as example.com and point to a zone file where NS, A, and other records are stored.

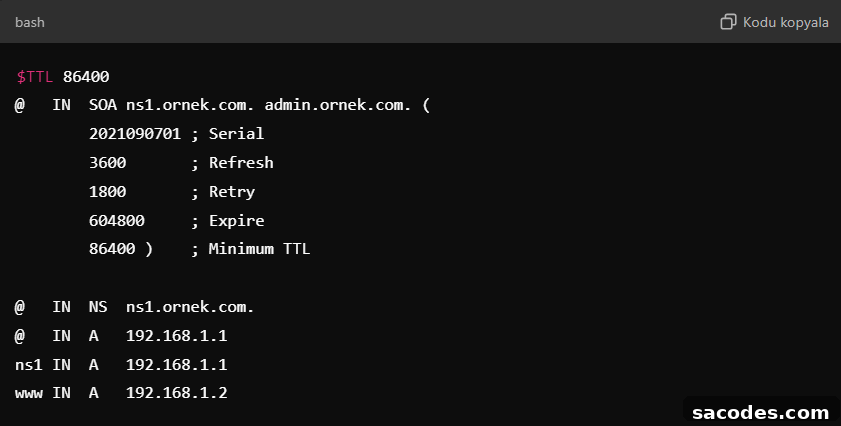
Step 3: Create Zone Files
Zone files define the DNS records for your domain. A typical zone file contains the Start of Authority (SOA) record, NS records, A records, and any other records needed for mail or subdomains. For example, a zone file can point www.example.com to a specific IP address.
Step 4: Restart the BIND Service
After editing configuration and zone files, restart or reload the BIND service so changes take effect. Use the service management tools available on your operating system to apply the new configuration.

3. Installing a DNS Server on Windows Server
On Windows Server, you can install the DNS Server role through Server Manager and manage zones and records via the DNS Manager console.
Step 1: Install the DNS Role
Open Server Manager and add the DNS Server role from the Roles and Features wizard. This installs the Microsoft DNS service required for authoritative DNS on Windows.
Step 2: Create Zones
Use the DNS Manager to create a new Forward Lookup Zone for your domain. Follow the wizard to configure zone type (primary, secondary, or stub) and define zone-related settings.
- Open DNS Manager.
- Right-click Forward Lookup Zones and choose New Zone.
- Complete the wizard to create a zone for your domain, such as example.com.
Step 3: Add DNS Records
After creating a zone, add the necessary records—A, AAAA, MX, CNAME, and others—to map names to IP addresses and configure mail routing, subdomains, and services.
4. Managing a DNS Server
Installing a DNS server is just the first step. Ongoing management is required to keep records accurate, maintain performance, and secure the service.
Updating DNS Records
DNS records change over time—new subdomains are added, services move to different IPs, or mail servers change. Update your zone files or use the DNS management tools on Windows to keep records current. Ensure you follow proper syntax and increment serial numbers so secondary servers can synchronize changes.
DNS Caching
DNS servers and resolvers cache query results to improve speed and reduce load. After updating records, you may need to clear caches so clients receive the latest information. Use the appropriate cache-flush tools for your DNS software or operating system to force refreshed lookups.

DNS Server Monitoring
Monitor DNS availability and performance using monitoring solutions that track query response times, error rates, and uptime. Tools such as Nagios and Zabbix are commonly used to alert administrators to outages or abnormal behavior. Regularly review DNS logs to identify misconfigurations and suspicious activity.
5. Security Measures
DNS servers can be targeted by attackers. Implement the following measures to reduce risk:
- Firewall Rules: Restrict access so the DNS server only accepts traffic on the required ports (typically UDP and TCP 53) from trusted sources when appropriate.
- DNSSEC: Enable DNSSEC to add cryptographic signatures to DNS data, helping prevent cache poisoning and DNS spoofing.
- Network Isolation: Place authoritative DNS infrastructure on segmented or isolated networks where possible to limit exposure.
A well-planned DNS deployment improves network reliability and user experience. Whether on Linux with BIND or on Windows Server, ensure your DNS configuration is accurate, monitor performance continually, and apply security best practices to protect your infrastructure.